How to Enable and Create a Codex Pet
This article walks through the full process of enabling pets in Codex, installing a custom pet, and creating your own pet from a reference image. The example here is FleetSnowfluff.
This is for people who already use Codex Desktop or Codex CLI and want to enable a built-in pet, install a custom animated pet, or make one of their own and share it.
1. Understand the Basics First
1.1 What Is a Codex Pet?
A Codex pet is a tiny animated companion whose behavior changes with your working state. An installable pet is usually a local folder containing at least:
<pet-id>/
  pet.json
  spritesheet.webp
pet.json describes the name, ID, description, and spritesheet file path. spritesheet.webp is the animation atlas.
The final install package in this repo is:
~/.codex/pets/fleetsnowfluff/
  pet.json
  spritesheet.webp
1.2 The hatch-pet Skill and the Pet Package Are Not the Same Thing
hatch-petis the Codex Skill used to create pets.~/.codex/pets/<pet-id>/is the finished pet package that Codex reads.
In other words, if someone gives you a finished pet package, you do not need to install hatch-pet.
You only need hatch-pet when you want to generate a pet yourself from an image or prompt.
2. How to Enable Pets in Codex
2.1 Enable a Built-in Pet
In Codex Desktop:
- Open Codex.
- Go to
Settings. - Open
Appearance. - Find the
Petssection. - Choose the pet you want to enable.
- If the UI shows
Tuck Away Pet, you can use it to temporarily hide the pet.
You can also use this inside a Codex session:
/petIf you cannot see the pet selector, update Codex first, then restart the app.
2.2 Enable a Custom Pet
Put the pet package into the local Codex pets directory.
macOS / Linux:
mkdir -p "$HOME/.codex/pets/fleetsnowfluff"
cp pet.json spritesheet.webp "$HOME/.codex/pets/fleetsnowfluff/"
Windows PowerShell:
New-Item -ItemType Directory -Force "$env:USERPROFILE\.codex\pets\fleetsnowfluff"
Copy-Item .\pet.json, .\spritesheet.webp "$env:USERPROFILE\.codex\pets\fleetsnowfluff\"
Then restart Codex and return to:
Settings -> Appearance -> PetsChoose FleetSnowfluff.
3. Custom Pet File Requirements
3.1 Minimal pet.json
{
  "id": "fleetsnowfluff",
  "displayName": "FleetSnowfluff",
  "description": "A tiny pink-haired chibi coder sprite with oversized sunglasses, white-blue outfit, and small attached wings.",
  "spritesheetPath": "spritesheet.webp"
}
Notes:
idshould use lowercase letters, numbers, and hyphens.- The folder name should preferably match the
id. displayNameis the name shown in the UI and can keep capitalization.spritesheetPathusually points tospritesheet.webpin the same directory.
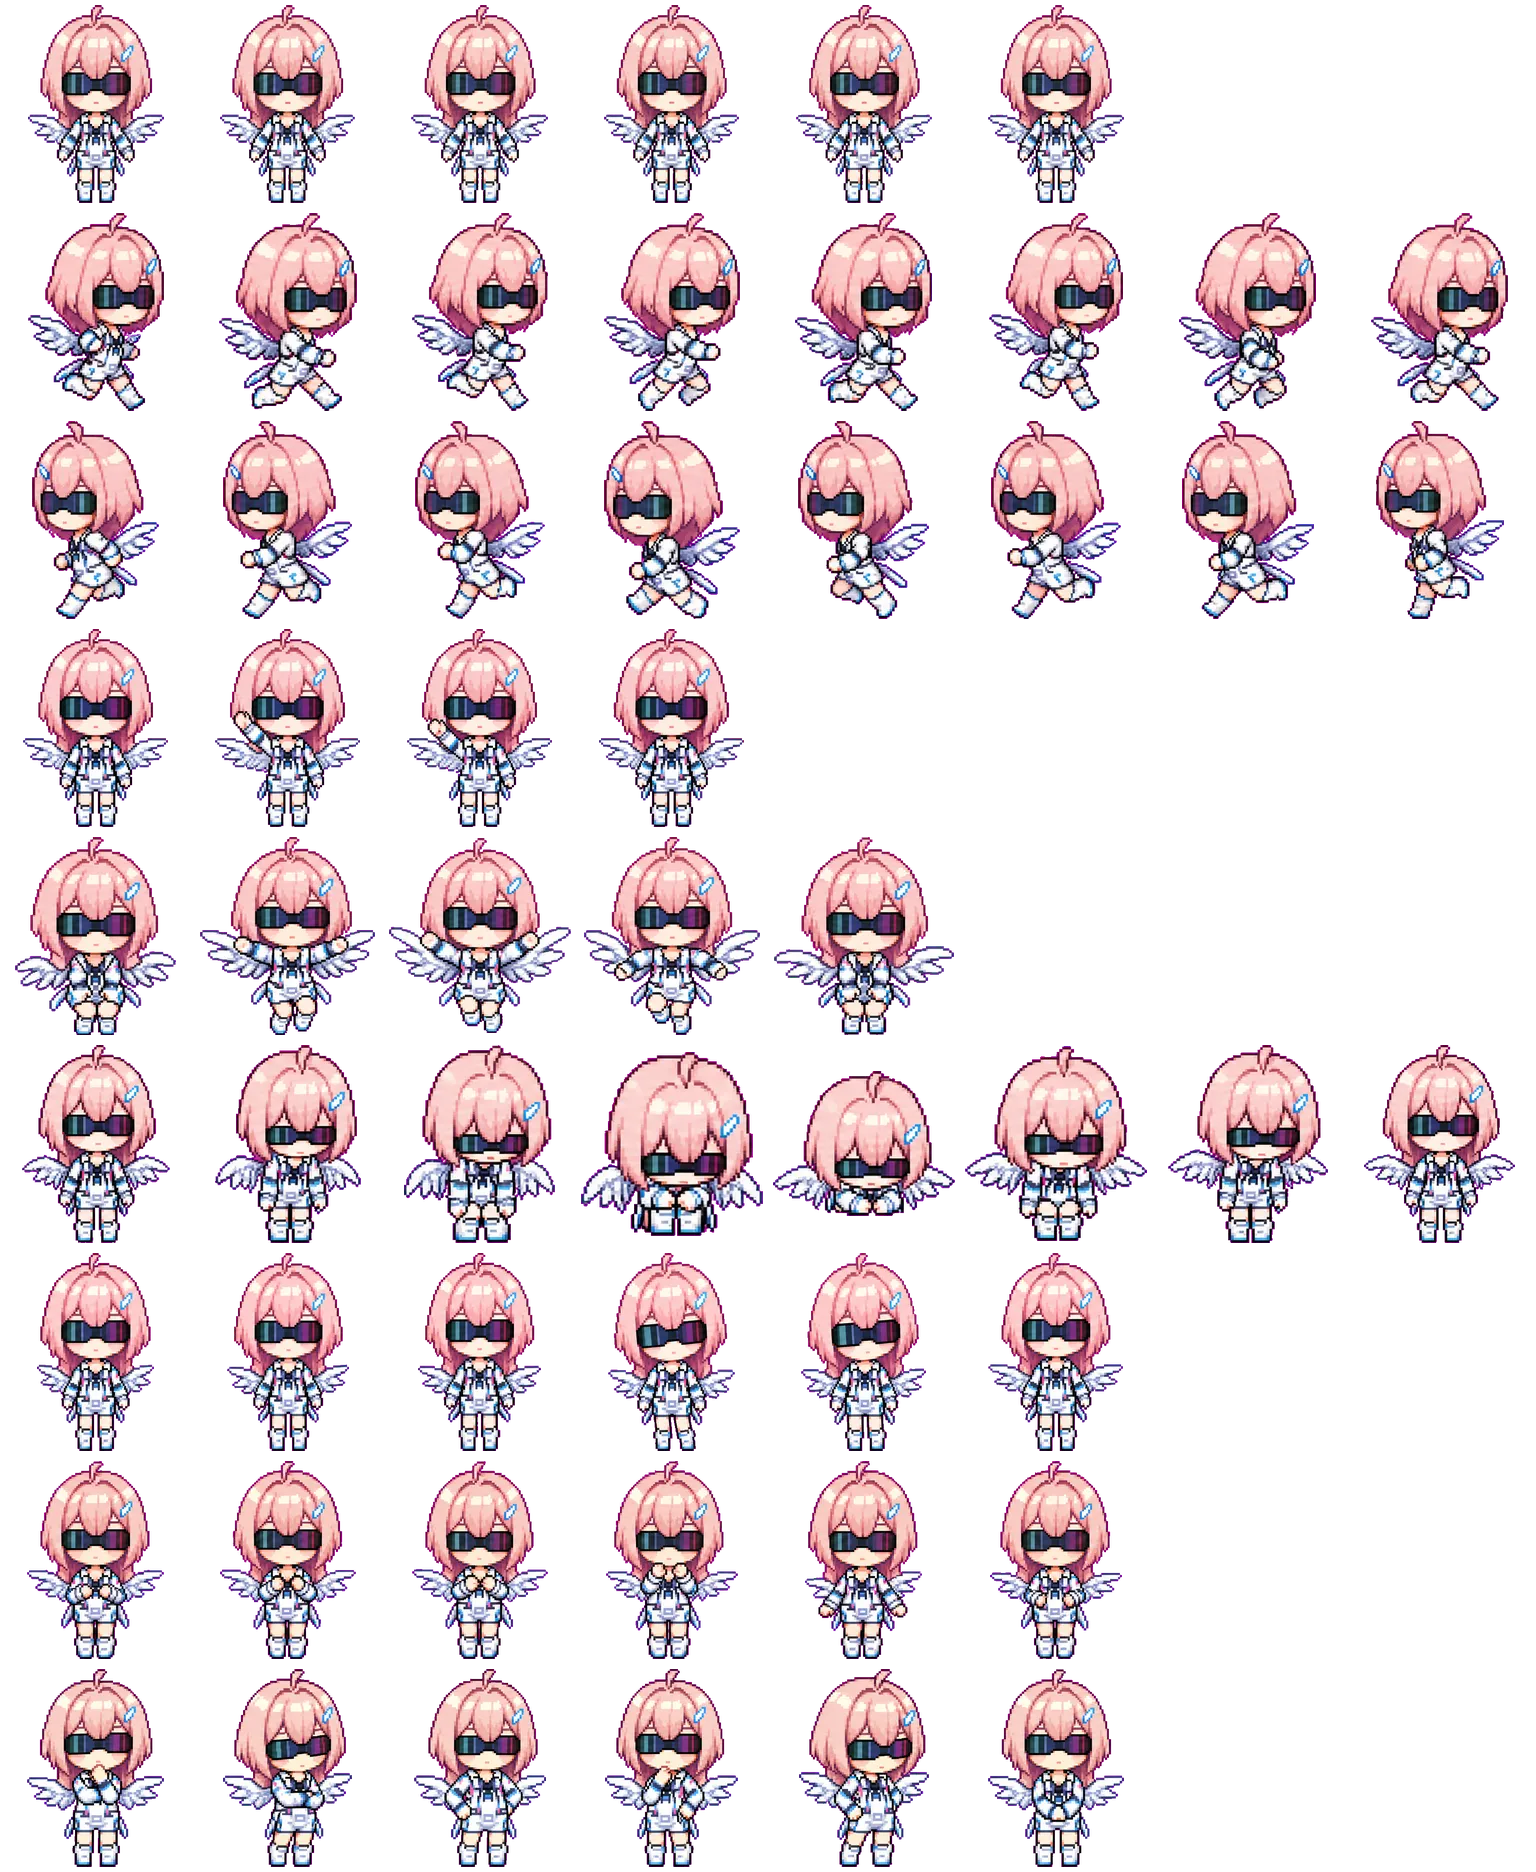
3.2 Spritesheet Atlas Specs
The hatch-pet workflow uses a fixed atlas:
Size: 1536 x 1872
Grid: 8 columns x 9 rows
Cell: 192 x 208
Format: WebP or PNG, with transparent background support required
The 9 rows map to these states:
| Row | State | Frames | Purpose |
|---|---|---|---|
| 0 | idle | 6 | Idle, breathing, blinking |
| 1 | running-right | 8 | Moving right |
| 2 | running-left | 8 | Moving left |
| 3 | waving | 4 | Waving |
| 4 | jumping | 5 | Jumping |
| 5 | failed | 8 | Failure or disappointment |
| 6 | waiting | 6 | Waiting |
| 7 | running | 6 | Task in progress |
| 8 | review | 6 | Checking or reviewing |
Unused cells must be transparent.
4. How to Make Your Own Pet With hatch-pet
If you have not installed hatch-pet, type this in Codex:
$skill-installer hatch-petRestart Codex after installation.
If you need to manually install the curated skill, you can refer to the installation method in the OpenAI skills repository:
python "$CODEX_HOME/skills/.system/skill-installer/scripts/install-skill-from-github.py" \
  --repo openai/skills \
  --path skills/.curated/hatch-pet
Usually, you do not need to run this manually. Using $skill-installer hatch-pet in Codex is easier.
5. Create a Pet From a Reference Image
5.1 Prepare the Reference Image
The reference image can be:
- a character avatar
- a pixel character
- a mascot
- a screenshot
- a logo or sketch
The clearer the image, the more stable the result. It is best to decide these things in advance:
- the pet name
- the core traits that must be preserved
- any accessories or body structure that must remain
- things that should not be generated
For FleetSnowfluff, the most important traits in the reference image were:
- short pink hair
- oversized black sunglasses
- white and blue futuristic outfit
- small boots
- white and blue wings attached to both sides of the body
5.2 Recommended Prompt Pattern
You can ask Codex like this:
Use $hatch-pet to create a Codex pet based on this reference image.
Name: FleetSnowfluff
Must preserve: short pink hair, black sunglasses, white-blue clothing, white-blue wings.
Style: Codex digital pet, pixel-art-adjacent, small body, thick outline, transparent background.
Avoid: text, background, shadows, floating decorations, music notes, scattered stars.
When finished, generate pet.json, spritesheet.webp, QA contact sheet, and preview videos.
The important part is to state “must preserve” and “avoid” clearly.
5.3 Normal Generation Flow
The hatch-pet process can be understood as four steps:
- Prepare the run directory, name, description, and prompt.
- Generate the base pet, which becomes the main visual reference.
- Generate the 9 rows of actions from the base.
- Compose the spritesheet, run QA, and package it into
~/.codex/pets/<pet-id>/.
Our FleetSnowfluff run looked like this:
Getting FleetSnowfluff ready.
Imagining FleetSnowfluff's main look.
Picturing FleetSnowfluff's poses.
Hatching FleetSnowfluff.
5.4 Why You Should Confirm the Base First
The base image is the identity anchor for every later action row. If the base is wrong, the action rows are usually wrong too.
When checking the base, look for:
- whether the character is a complete full-body sprite;
- whether the core traits are preserved;
- whether it has a clean solid chroma-key background;
- whether it contains unwanted text, shadows, floating decorations, and similar artifacts;
- whether it will still read well when scaled down to a 192 x 208 cell.
FleetSnowfluff’s first base did not include wings, so it had to be regenerated. The second base preserved the wings, and only then did we continue to action-row generation.
6. Action Row Generation Tips
6.1 Use Subagents to Generate Rows in Parallel
hatch-pet works well when each action row is handed to a subagent in parallel. Each subagent handles one state:
idle
running-right
running-left
waving
jumping
failed
waiting
running
review
The parent session only needs to:
- record generation results
- decide whether to mirror
running-left - run the final composition
- check QA
- package the pet
This avoids multiple agents editing imagegen-jobs.json at the same time and causing conflicts.
6.2 Do Not Mirror running-left Casually
Some pets can use a horizontally mirrored running-right row as running-left. But if the character has asymmetric traits, do not mirror it.
FleetSnowfluff has a blue hair clip, sunglasses gradient, and directional wing details, so we generated running-left separately instead of mirroring it.
Use this rule of thumb:
- If there is a one-sided hair clip, logo, text, or weapon, do not mirror.
- If there is directional lighting or a handheld prop, do not mirror.
- If the character is completely symmetrical, mirroring may be acceptable.
6.3 Common Rules for Each Row
idle: use only subtle breathing, blinking, and vertical bobbing.waving: express the wave through the hand pose only; do not draw wave lines.jumping: show the jump through body position only; do not draw ground shadows or landing smoke.failed: small tears or smoke close to the body can work, but do not add floating red crosses or symbols.waiting: keep it quiet and simple; do not add complex props.running: this means “task in progress,” not literal running.review: show focus through leaning, head angle, or hand pose; do not add code windows or sheets of paper.
7. QA and Validation
After generation, check at least these files:
qa/contact-sheet.png
qa/reports/review.json
qa/reports/validation.json
qa/videos/*.mp4
The QA files in this repo are:
qa/contact-sheet.png
qa/reports/review.json
qa/reports/validation.json
qa/videos/
7.1 What to Check in the Contact Sheet
Manually inspect the contact sheet:
- whether each row represents the correct state;
- whether each state has the correct frame count;
- whether the character identity stays consistent;
- whether wings, hairstyle, sunglasses, and outfit remain consistent;
- whether there are white backgrounds, shadows, floating clutter, cropping issues, or empty frames.
7.2 What to Check in JSON Validation
validation.json should have no:
"errors": []Ideally it should also have no:
"warnings": []review.json should show ok: true for every row.
7.3 Preview Videos
If ffmpeg is installed, preview MP4 files can be generated for each state.
If ffmpeg is missing, the spritesheet and pet package can still be generated. You simply will not have video previews. When we created FleetSnowfluff, we hit this first, installed ffmpeg, and then generated:
qa/videos/idle.mp4
qa/videos/running-right.mp4
qa/videos/running-left.mp4
qa/videos/waving.mp4
qa/videos/jumping.mp4
qa/videos/failed.mp4
qa/videos/waiting.mp4
qa/videos/running.mp4
qa/videos/review.mp4
8. The Right Way to Rename a Pet
Changing only displayName is not enough. You should update all of these together:
~/.codex/pets/<pet-id>/
pet.json
run metadata
README / docs
QA summary
Git repository directory
For FleetSnowfluff:
{
  "id": "fleetsnowfluff",
  "displayName": "FleetSnowfluff",
  "spritesheetPath": "spritesheet.webp"
}
The directory should also be:
~/.codex/pets/fleetsnowfluffIf you keep the generation run directory, it is also worth replacing the old name globally to avoid confusion during uploads or future maintenance.
Check for leftover names:
rg -n "OldName|oldname" .9. Package It as an Uploadable Repository
Recommended final repository structure:
my-pet/
  README.md
  pet.json
  spritesheet.webp
  qa/
    contact-sheet.png
    reports/
      review.json
      validation.json
    videos/
      idle.mp4
      running-right.mp4
      running-left.mp4
      waving.mp4
      jumping.mp4
      failed.mp4
      waiting.mp4
      running.mp4
      review.mp4
Initialize git:
git init
git add .
git commit -m "Add FleetSnowfluff Codex pet"
Upload to GitHub:
git remote add origin git@github.com:<user>/<repo>.git
git push -u origin main
If you use HTTPS:
git remote add origin https://github.com/<user>/<repo>.git
git push -u origin main
10. FAQ
The Pet Does Not Appear in Codex
Check:
- whether it is placed under
~/.codex/pets/<pet-id>/; - whether
pet.jsonandspritesheet.webpboth exist; - whether
spritesheetPathinpet.jsonis correct; - whether
idmatches the directory name; - whether Codex has been restarted.
The Pet Has a White Background or Background Residue
This usually means transparency handling failed. Regenerate or repair the affected row and make sure:
- the background is a solid chroma-key color;
- there are no shadows, gradients, or glows;
- the background color is not used on the character itself.
One Action Row Is Broken
Do not remake the whole pet. Repair only the failed row:
queue repair -> regenerate that row -> record result -> finalize againThe Character Changes During Animation
This is identity drift. When repairing it, use the base image, original image, contact sheet, and failure description as grounding context. Ask it to regenerate only the failed row.
I Want to Preserve a Specific Detail
Say so before generating the base. For example, FleetSnowfluff’s wings were required:
Must preserve the white-blue wings. The wings are part of the body silhouette, not floating decorations.11. A Copy-ready Pet Creation Request
Use $hatch-pet to help me create a Codex pet.

Name: <YourPetName>
Reference image: attached
Must preserve:
- <core trait 1>
- <core trait 2>
- <core trait 3>

Style:
- Codex digital pet
- pixel-art-adjacent
- small chibi proportions
- thick dark outline
- transparent background
- flat cel shading

Avoid:
- text
- background
- shadows
- floating decorations
- wave lines
- speed lines
- particle effects

Please generate:
- pet.json
- spritesheet.webp
- QA contact sheet
- preview videos for every state

If one step fails, retry only the failed row instead of remaking the whole pet.
When finished, organize it as a git repository so it can be uploaded easily.
12. FleetSnowfluff Output From This Repo
pet.json
spritesheet.webp
qa/contact-sheet.png
qa/reports/review.json
qa/reports/validation.json
qa/videos/*.mp4
Example install path:
~/.codex/pets/fleetsnowfluffThis repository can be uploaded directly, or copied directly to ~/.codex/pets/fleetsnowfluff for use.