Deploy Xboard Directly on Linux for a Self-Hosted Proxy Panel
Jun 22, 2026
Deploy Xboard Directly on Linux for a Self-Hosted Proxy Panel
This guide comes from a recent end-to-end deployment session where I set up an Xboard panel, Caddy for HTTPS, Hysteria2 nodes, a dedicated subscription domain, SMTP mail, and the final production hardening steps from scratch.
This setup fits a fairly common pattern: one public Linux server runs the Xboard panel, and one or more Linux VPS instances serve as nodes. You can host Xboard locally if you really want to, but you still need at least one overseas server for the node side.
Preparation Checklist
Before you start, make sure you already have the following:
- One panel server: Ubuntu 22.04 / 24.04 or Debian 12, ideally with at least 1 GB RAM, with
80/tcpand443/tcpavailable. - One or more node servers: Ubuntu 22.04 / 24.04 or Debian 12, running Hysteria2, with
8443/udpopen, or later20000-29999/udpif you plan to use port hopping. - A split domain layout: one panel domain, one subscription domain, and one or more node domains.
- Access to Cloudflare DNS management, since the examples in this post assume Cloudflare.
- An SMTP provider for sending mail. This guide uses Brevo’s free SMTP.
- A mailbox that can receive verification messages. Here it is paired with Cloudflare Email Routing.
- Basic system tools:
curl,wget,git,ufw, and later Docker, Caddy, and certbot.
The example domains in this guide are:
Panel domain: v.shishishi3.com
Subscription domain: 474769754.xyz
Hong Kong node: hk.474769754.xyz
US node: us.474769754.xyz
Replace them with your own domains in practice.
Architecture
This post uses a direct Linux deployment model:
User -> HTTPS domain -> Linux server with Caddy -> Xboard container
User -> HY2 node domain over UDP -> Linux node server running xboard-node
I strongly recommend separating the responsibilities of your domains:
v.shishishi3.com
Purpose: the main Xboard panel, admin login, and management operations

474769754.xyz
Purpose: subscription distribution entry

hk.474769754.xyz
Purpose: Hong Kong node domain

us.474769754.xyz
Purpose: US node domainDo not use the same domain for the admin panel, subscriptions, and nodes. Splitting them makes troubleshooting and risk control much cleaner, and it also reduces the blast radius if one part gets blocked or abused.
If you want a separate subscription entry, a cheap numeric domain is usually enough. In practice it often costs less than ¥10.
Tutorial
1. Prepare the Servers
Recommended specs for the panel server:
OS: Ubuntu 22.04 / 24.04 or Debian 12
Memory: 1 GB minimum, 2 GB preferred
Ports: 80/tcp, 443/tcp
Recommended specs for node servers:
OS: Ubuntu 22.04 / 24.04 or Debian 12
Protocol: Hysteria2
Ports: 8443/udp, or 20000-29999/udp for port hopping
Start with a system update:
sudo apt-get update
sudo apt-get install -y curl wget ca-certificates git ufwIf this gets stuck because of an old Ookla speedtest repository, jump to Broken apt source.
2. Configure DNS
Example Cloudflare DNS records:
A  v    panel server IP  DNS only
A  @    panel server IP  DNS only
A  hk   Hong Kong node IP  DNS only
A  us   US node IP  DNS only
Important details:
- For the root domain
474769754.xyz, the hostname should be@, not the literal domain string. - Node domains must stay gray-clouded, meaning
DNS only. - HY2 uses UDP, and Cloudflare’s regular proxy does not forward that traffic.
- Fresh DNS changes may take a few minutes to propagate.
Verify with:
nslookup 474769754.xyz 1.1.1.1
nslookup hk.474769754.xyz 1.1.1.1
nslookup us.474769754.xyz 1.1.1.1If your local machine is using a proxy or TUN and you see 198.18.x.x fake IP results, jump to Fake-IP interference.
3. Install Docker and Compose
If Docker is not installed yet:
curl -fsSL https://get.docker.com | sudo sh
sudo systemctl enable --now docker
docker --version
docker compose version
4. Deploy Xboard
The official compose branch of Xboard ships with a Docker Compose template that exposes container port 7001 to host port 7001.
cd /opt
sudo git clone -b compose --depth 1 https://github.com/cedar2025/Xboard Xboard
cd /opt/Xboard
Make sure compose.yaml contains something like:
services:
  xboard:
    image: ghcr.io/cedar2025/xboard:latest
    restart: unless-stopped
    ports:
      - "7001:7001"
    volumes:
      - ./.env:/www/.env
      - ./.docker/.data/:/www/.docker/.data
      - ./storage/logs:/www/storage/logs
      - ./storage/theme:/www/storage/theme
      - ./plugins:/www/plugins
      - redis-data:/data
For a simple setup, initialize it with SQLite and the built-in Redis:
sudo docker compose run --rm \
  -e ENABLE_SQLITE=true \
  -e ENABLE_REDIS=true \
  -e ADMIN_ACCOUNT=admin@example.com \
  xboard php artisan xboard:install
The installer will print:
Admin email
Admin password
Admin path
Save those values, then bring the service up:
sudo docker compose up -d
sudo docker compose ps
sudo docker compose logs -f
Test local access:
curl -I http://127.0.0.1:7001The expected result is:
HTTP/1.1 200 OK5. Install Caddy
Install Caddy:
sudo apt-get install -y debian-keyring debian-archive-keyring apt-transport-https curl
curl -1sLf 'https://dl.cloudsmith.io/public/caddy/stable/gpg.key' \
  | sudo gpg --dearmor -o /usr/share/keyrings/caddy-stable-archive-keyring.gpg
curl -1sLf 'https://dl.cloudsmith.io/public/caddy/stable/debian.deb.txt' \
  | sudo tee /etc/apt/sources.list.d/caddy-stable.list
sudo apt-get update
sudo apt-get install -y caddy
Write this into /etc/caddy/Caddyfile:
v.shishishi3.com {
	reverse_proxy 127.0.0.1:7001
}

474769754.xyz {
	handle /s/* {
		reverse_proxy 127.0.0.1:7001
	}

	handle /api/v1/client/subscribe* {
		reverse_proxy 127.0.0.1:7001
	}

	respond "Not Found" 404
}
What this means:
v.shishishi3.com
Reverse-proxy the full Xboard panel.

474769754.xyz
Expose only subscription paths and keep the admin panel hidden.
The /s/* rule is important. A real Xboard subscription link often looks like:
https://474769754.xyz/s/xxxxxxxxxxxxxxxxIf you only allow /api/v1/client/subscribe*, the client import request can still get blocked by Caddy. If that happens, jump to Subscription 404.
Validate and reload Caddy:
sudo caddy validate --config /etc/caddy/Caddyfile
sudo systemctl reload caddy
sudo journalctl -u caddy -f
Test both domains:
curl -I https://v.shishishi3.com
curl -I https://474769754.xyz
Expected results:
https://v.shishishi3.com -> 200
https://474769754.xyz -> 404
A 404 on the root of the subscription domain is normal, because we intentionally do not expose the panel there.
If you get unexpected eof while reading here, jump to Caddy TLS EOF.
6. Basic Xboard Configuration
After logging into the panel, start by changing:
Site name: your own name
Site URL: your panel domain or subdomain, such as https://v.shishishi3.com
Subscription URL: your subscription domain or subdomain, such as https://474769754.xyz
Recommended security settings:
Admin path: change it to a random path
Open registration: enable only when ready, or keep it closed for private use
Email verification: enabled
Login captcha: enabled
Registration captcha: enabled
Subscription anti-leech: enabled
If the panel only offers one URL field, use:
https://v.shishishi3.comIf it provides a separate subscription URL field, use:
https://474769754.xyz7. SMTP Mail Configuration
If the panel is for personal use only, you may not need this section. But if you want email verification or password reset, set up SMTP properly.
Cloudflare Email Routing can receive and forward mail, but it is not an SMTP sending server.
This guide uses Brevo’s free SMTP:
SMTP host: smtp-relay.brevo.com
SMTP port: 587
Encryption: TLS
SMTP username: the SMTP Login provided by Brevo
SMTP password: your Brevo SMTP key
From address: noreply@474769754.xyz
A few details matter:
- Port
587meansTLSorSTARTTLS, notSSL/TLS. - Addresses like
ac96b9001@smtp-brevo.comare SMTP login usernames, not the visible sender address. - The sender address can be
noreply@474769754.xyz, but it must be verified in Brevo. - Cloudflare Email Routing can receive Brevo’s verification message for
noreply@474769754.xyz.
Cloudflare DNS allows only one SPF record. If Cloudflare already gives you:
v=spf1 include:_spf.mx.cloudflare.net ~alland Brevo asks for:
v=spf1 include:spf.brevo.com ~allmerge them into:
v=spf1 include:_spf.mx.cloudflare.net include:spf.brevo.com ~allIf verification mail is not arriving, inspect the Xboard logs:
cd /opt/Xboard
sudo docker compose logs --tail=160 xboard
sudo grep -R "SMTP\|Brevo\|SendEmailJob\|Unauthorized" storage/logs/If you see 525 5.7.1 Unauthorized IP address in the logs, jump to SMTP unauthorized IP.
8. Plan Design
Adjust your plans to fit your actual node machines and bandwidth. The examples below are simply the way I structured mine.
If the US node has plenty of traffic while the Hong Kong node is relatively limited, a reasonable split is:
US San Jose: main node, 1x
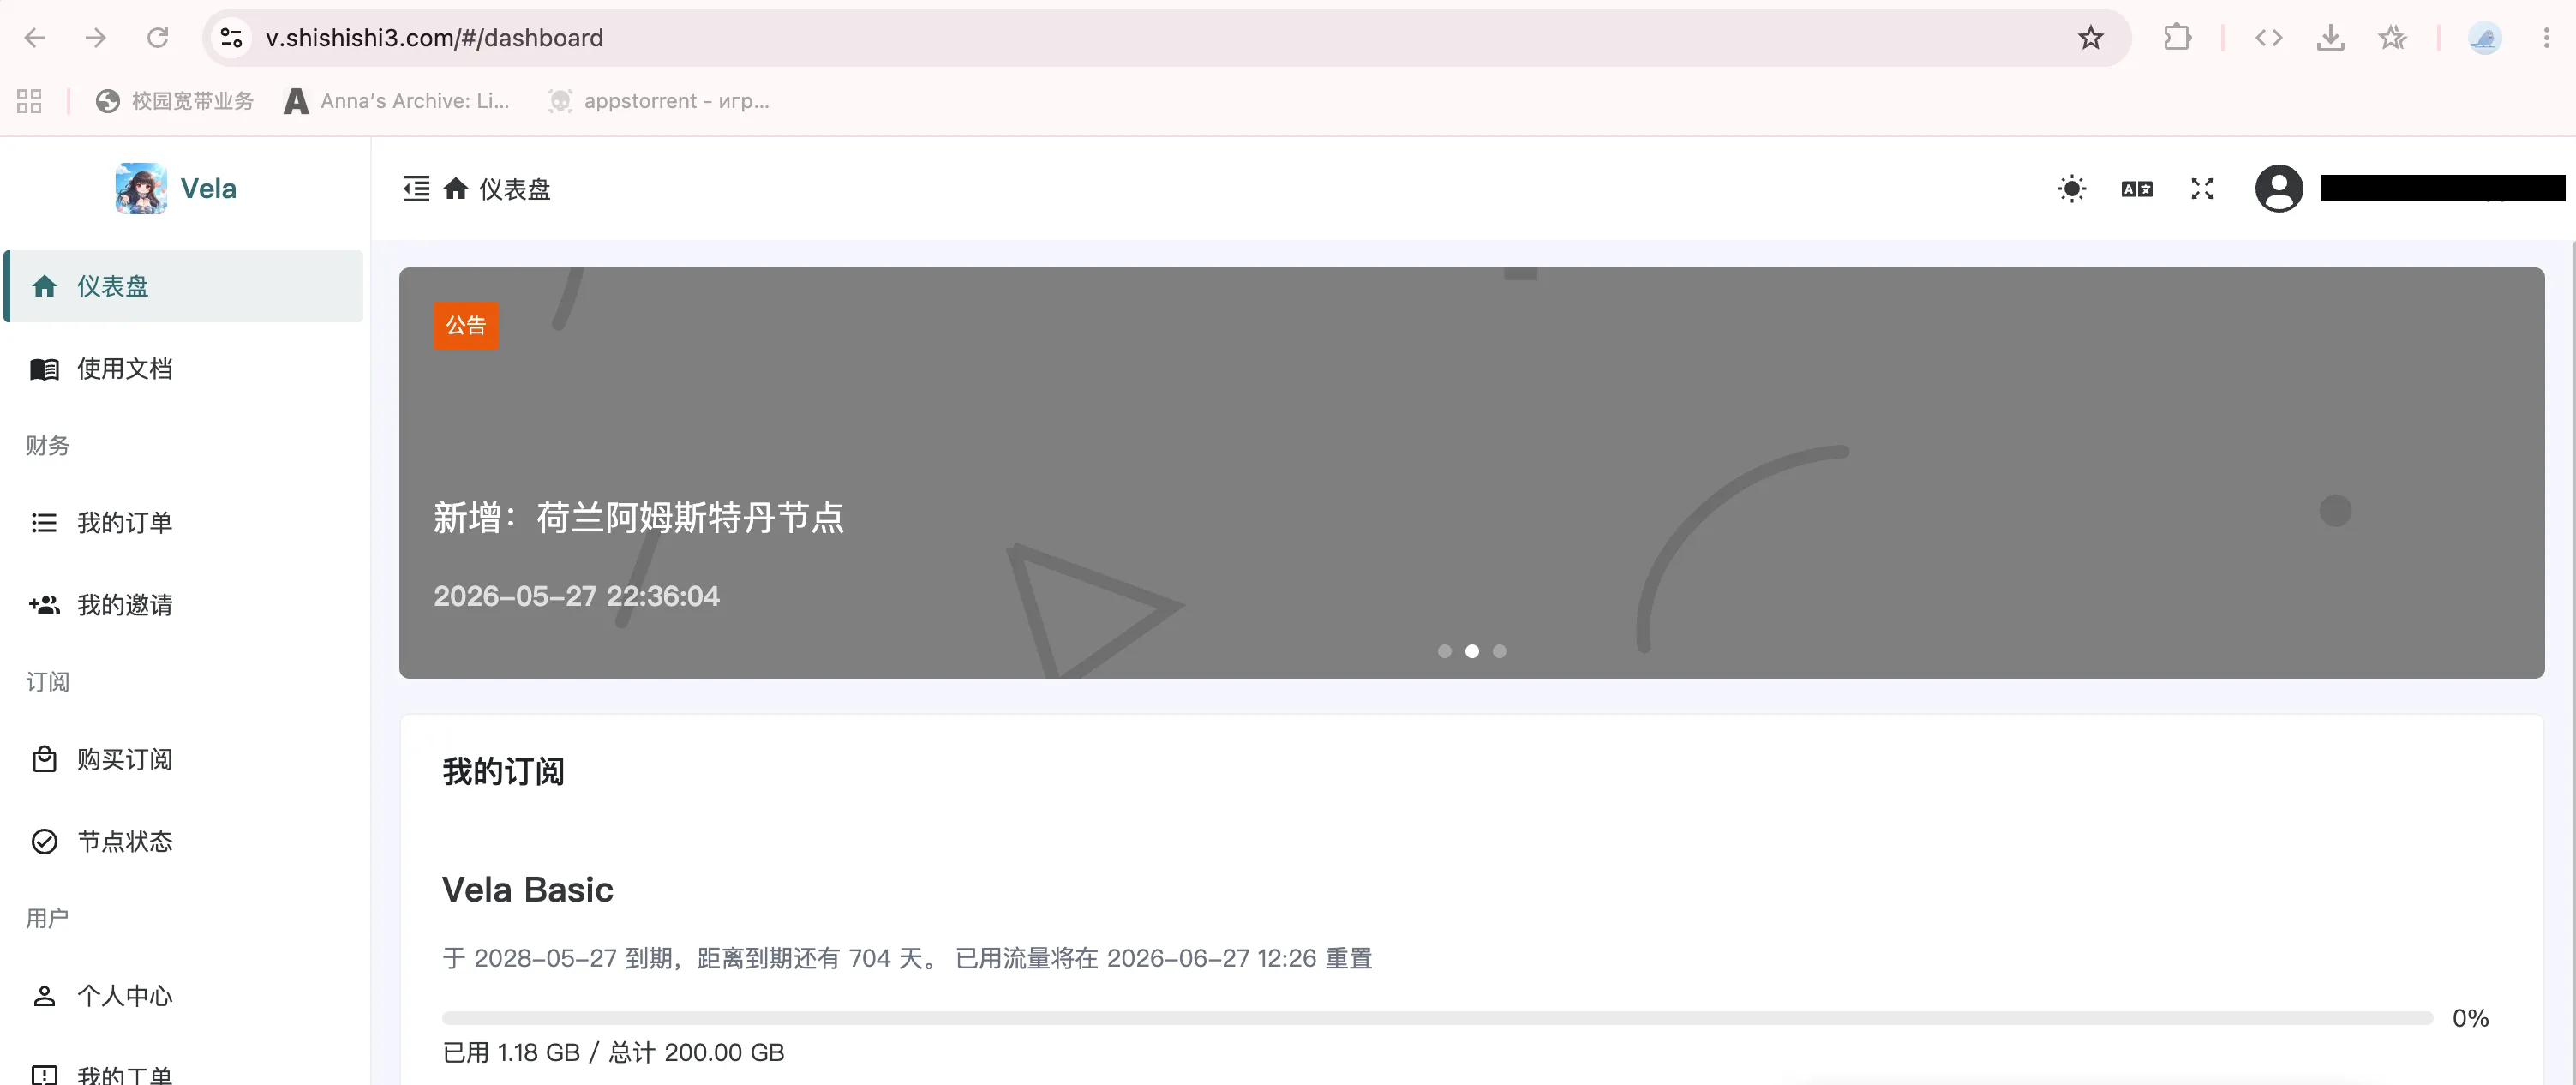
Hong Kong: backup node, 5x / 8x / 10xExample low-cost plan:
Plan name: Vela Basic
Monthly: ¥3.9
Yearly: ¥36
Traffic: 50 GB / month
Speed cap: 300 Mbps
Devices: 3
US: 1x
HK: 5x or higher
If the pricing is closer to:
Monthly: ¥3
Yearly: ¥30
then a more conservative package may be:
Traffic: 40 GB / month
Speed cap: 200 Mbps
Devices: 2
HK: 8x
Example plan description template:
## Plan Details

- Traffic: {{transfer}} GB
- Speed limit: {{speed}} Mbps
- Concurrent devices: {{devices}}
- Primary node: San Jose, US West Coast
- Backup node: high-multiplier Hong Kong node

## Service Notes

1. Traffic resets {{reset_method}}
2. Supports common iOS, Android, Windows, and macOS clients
3. The San Jose node is the primary route, with a 10 Gbps uplink and a real-world peak around 1.8 Gbps to 6 Gbps
4. The Hong Kong node is a backup route and uses a higher multiplier because monthly traffic is limited
5. Best suited for browsing, social media, AI tools, and light streaming
6. BT/PT, mining, scanning, spam, and long-term bandwidth abuse are not allowed
7. 24/7 technical support
9. Create HY2 Nodes
In the Xboard backend, choose:
Hysteria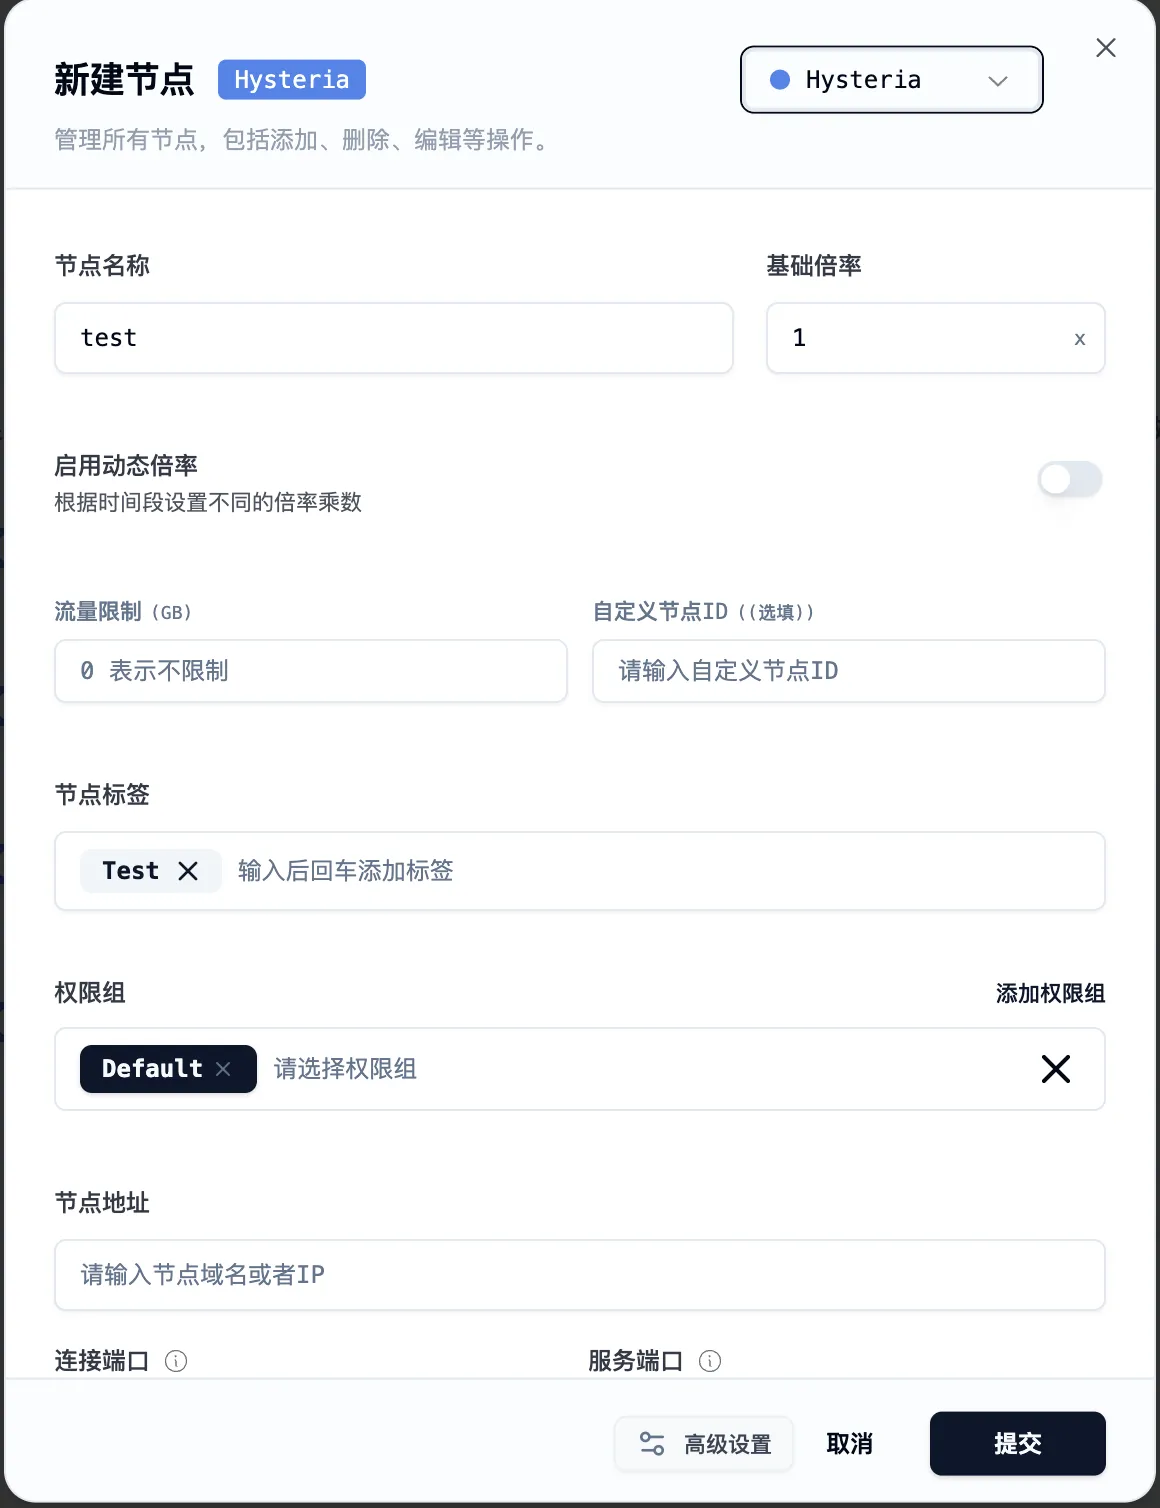
Example Hong Kong node:
Node name: HK-HY2-01
Base multiplier: 5
Traffic limit: 0
Tags: HK, HY2
Permission group: Default
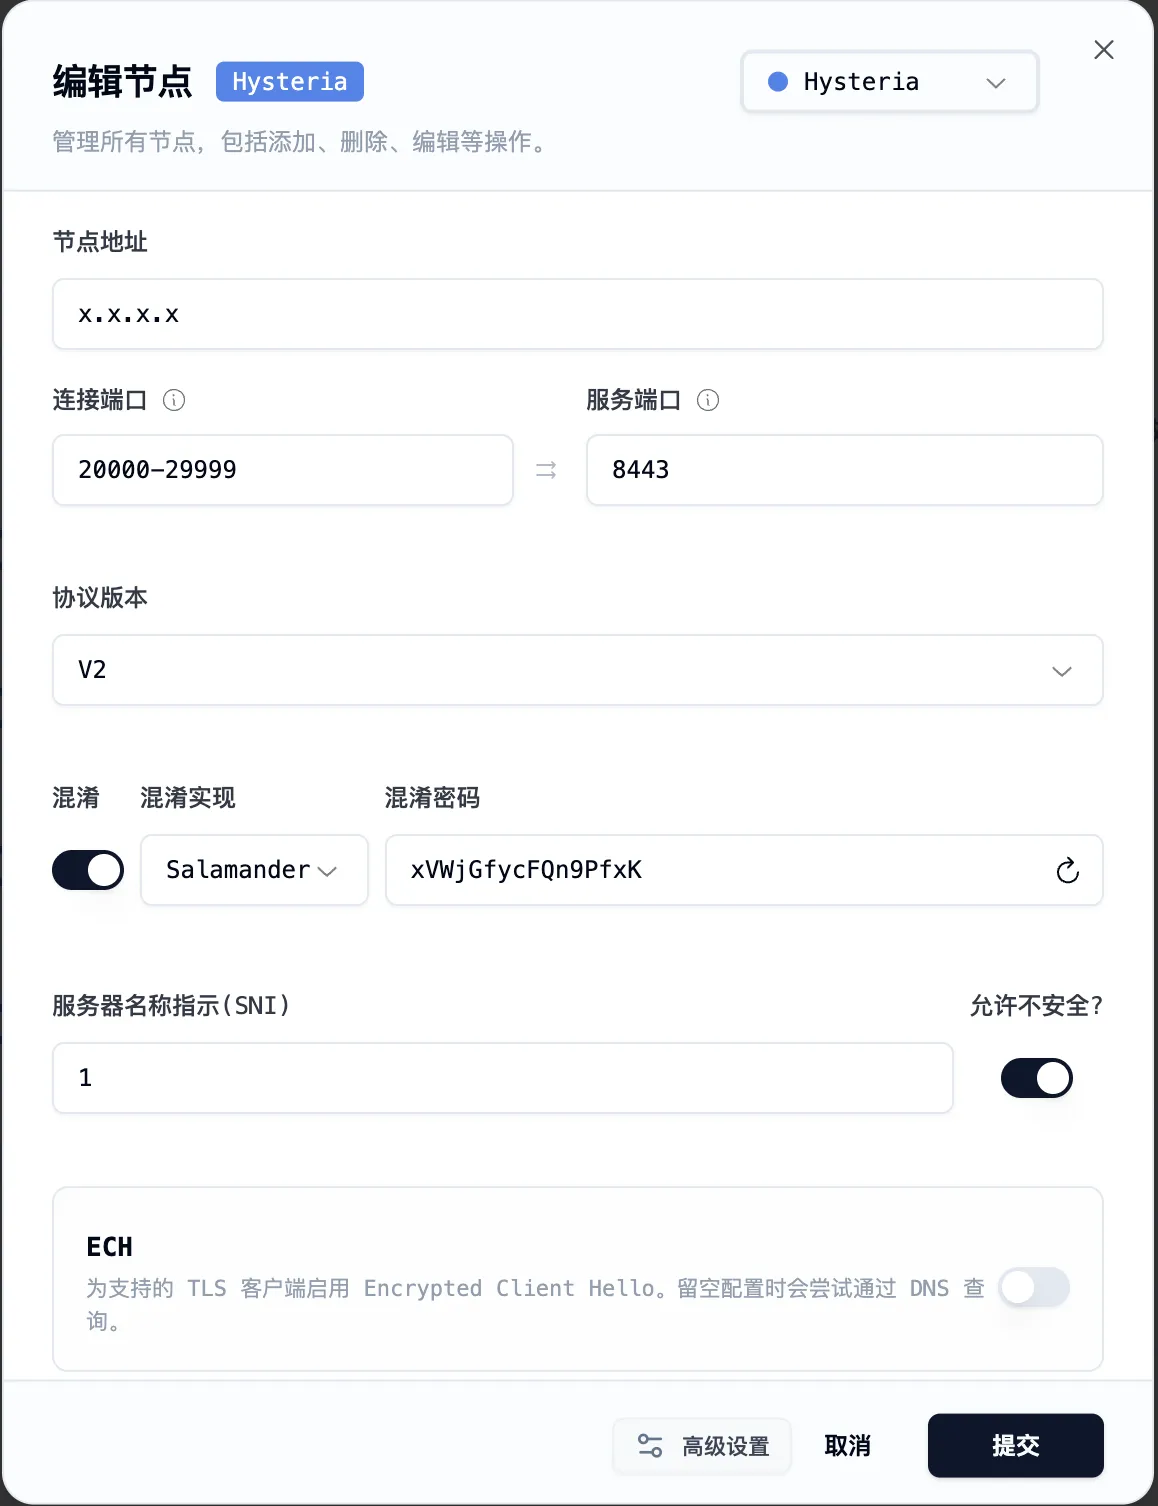
Node address: hk.474769754.xyz
Connect port: 8443
Service port: 8443
Protocol version: V2
Obfuscation: enabled
Obfuscation implementation: Salamander
Obfuscation password: random
SNI: hk.474769754.xyz
Allow insecure: disabled
ECH: disabled
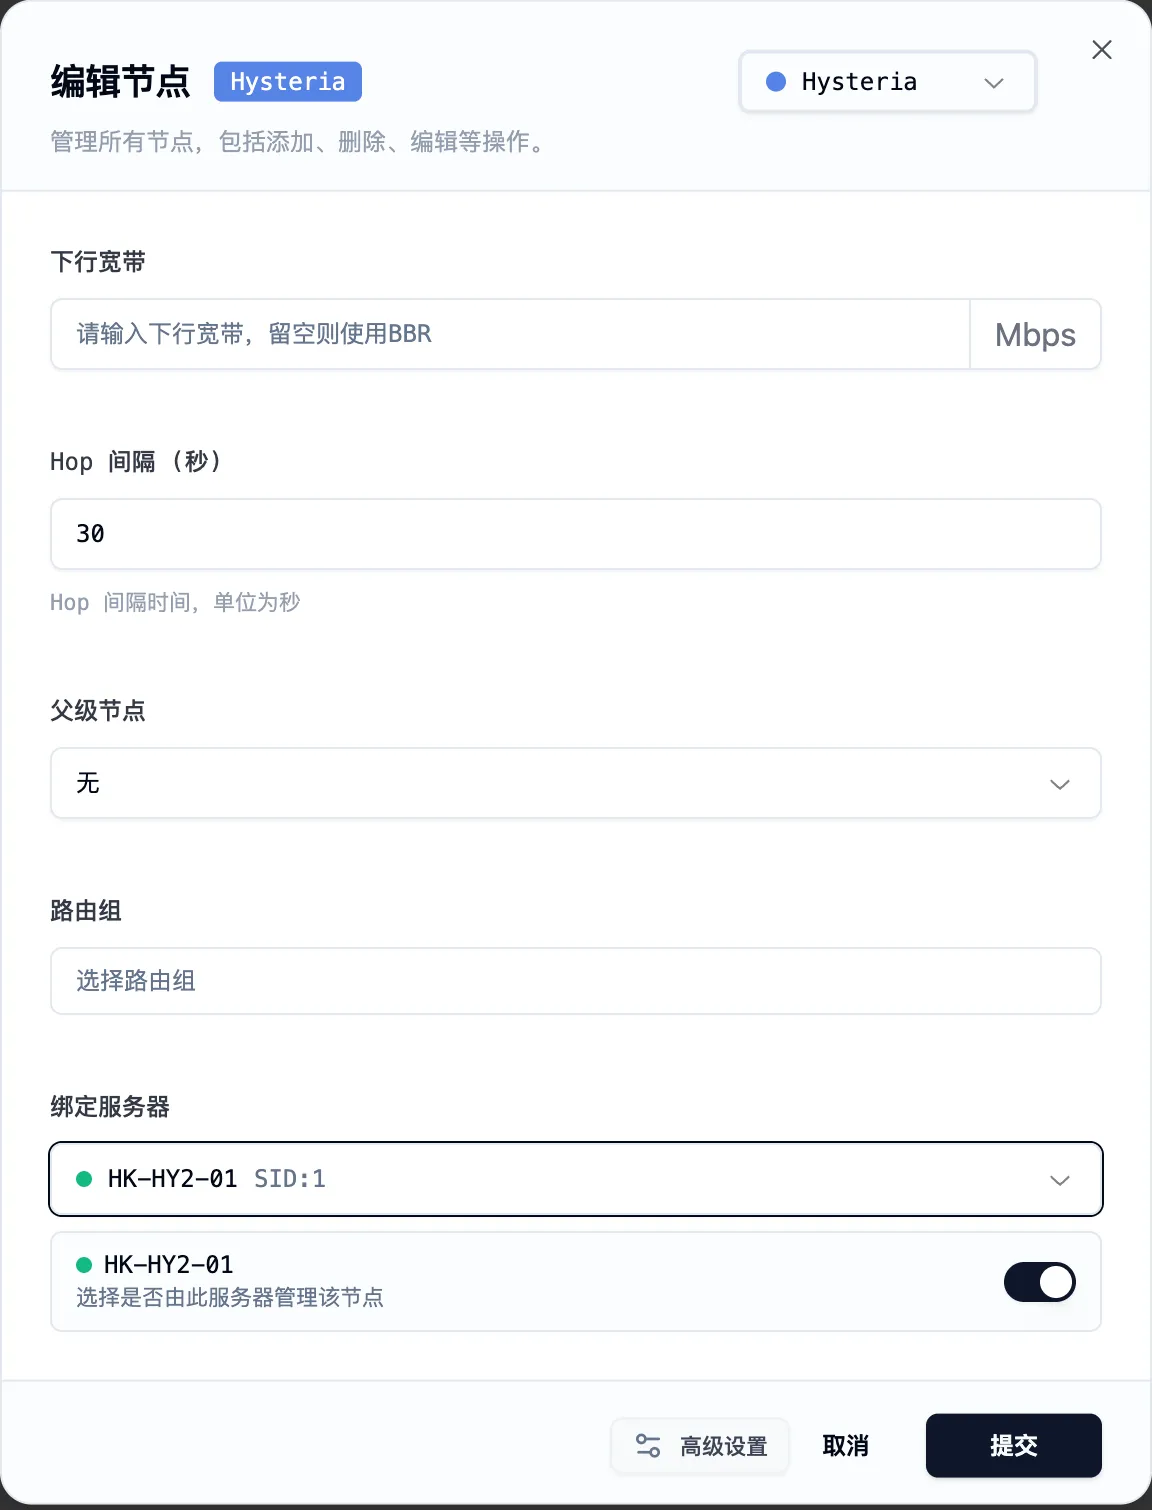
Upload bandwidth: set to the real line capacity
Download bandwidth: set to the real line capacity
Bind server: independent deployment or bind to the matching serverExample US node:
Node name: US-HY2-01
Base multiplier: 1
Node address: us.474769754.xyz
Connect port: 8443
Service port: 8443
SNI: us.474769754.xyz
Things to keep straight:
- ECH is not your TLS certificate.
- HY2 does not sit behind Caddy.
- Caddy cannot
reverse_proxyordinary HY2 UDP traffic. - Node domains must stay gray-clouded.
This next screenshot corresponds to the transport-layer settings, including connect port, service port, obfuscation, SNI, and ECH:
If you want to configure port hopping and server binding, this is the relevant part of the interface:
10. Install Xboard-Node
You can go straight to the Xboard backend, open Node Management -> Add Server, copy the generated xboard-node installation command, and run it on the node server.
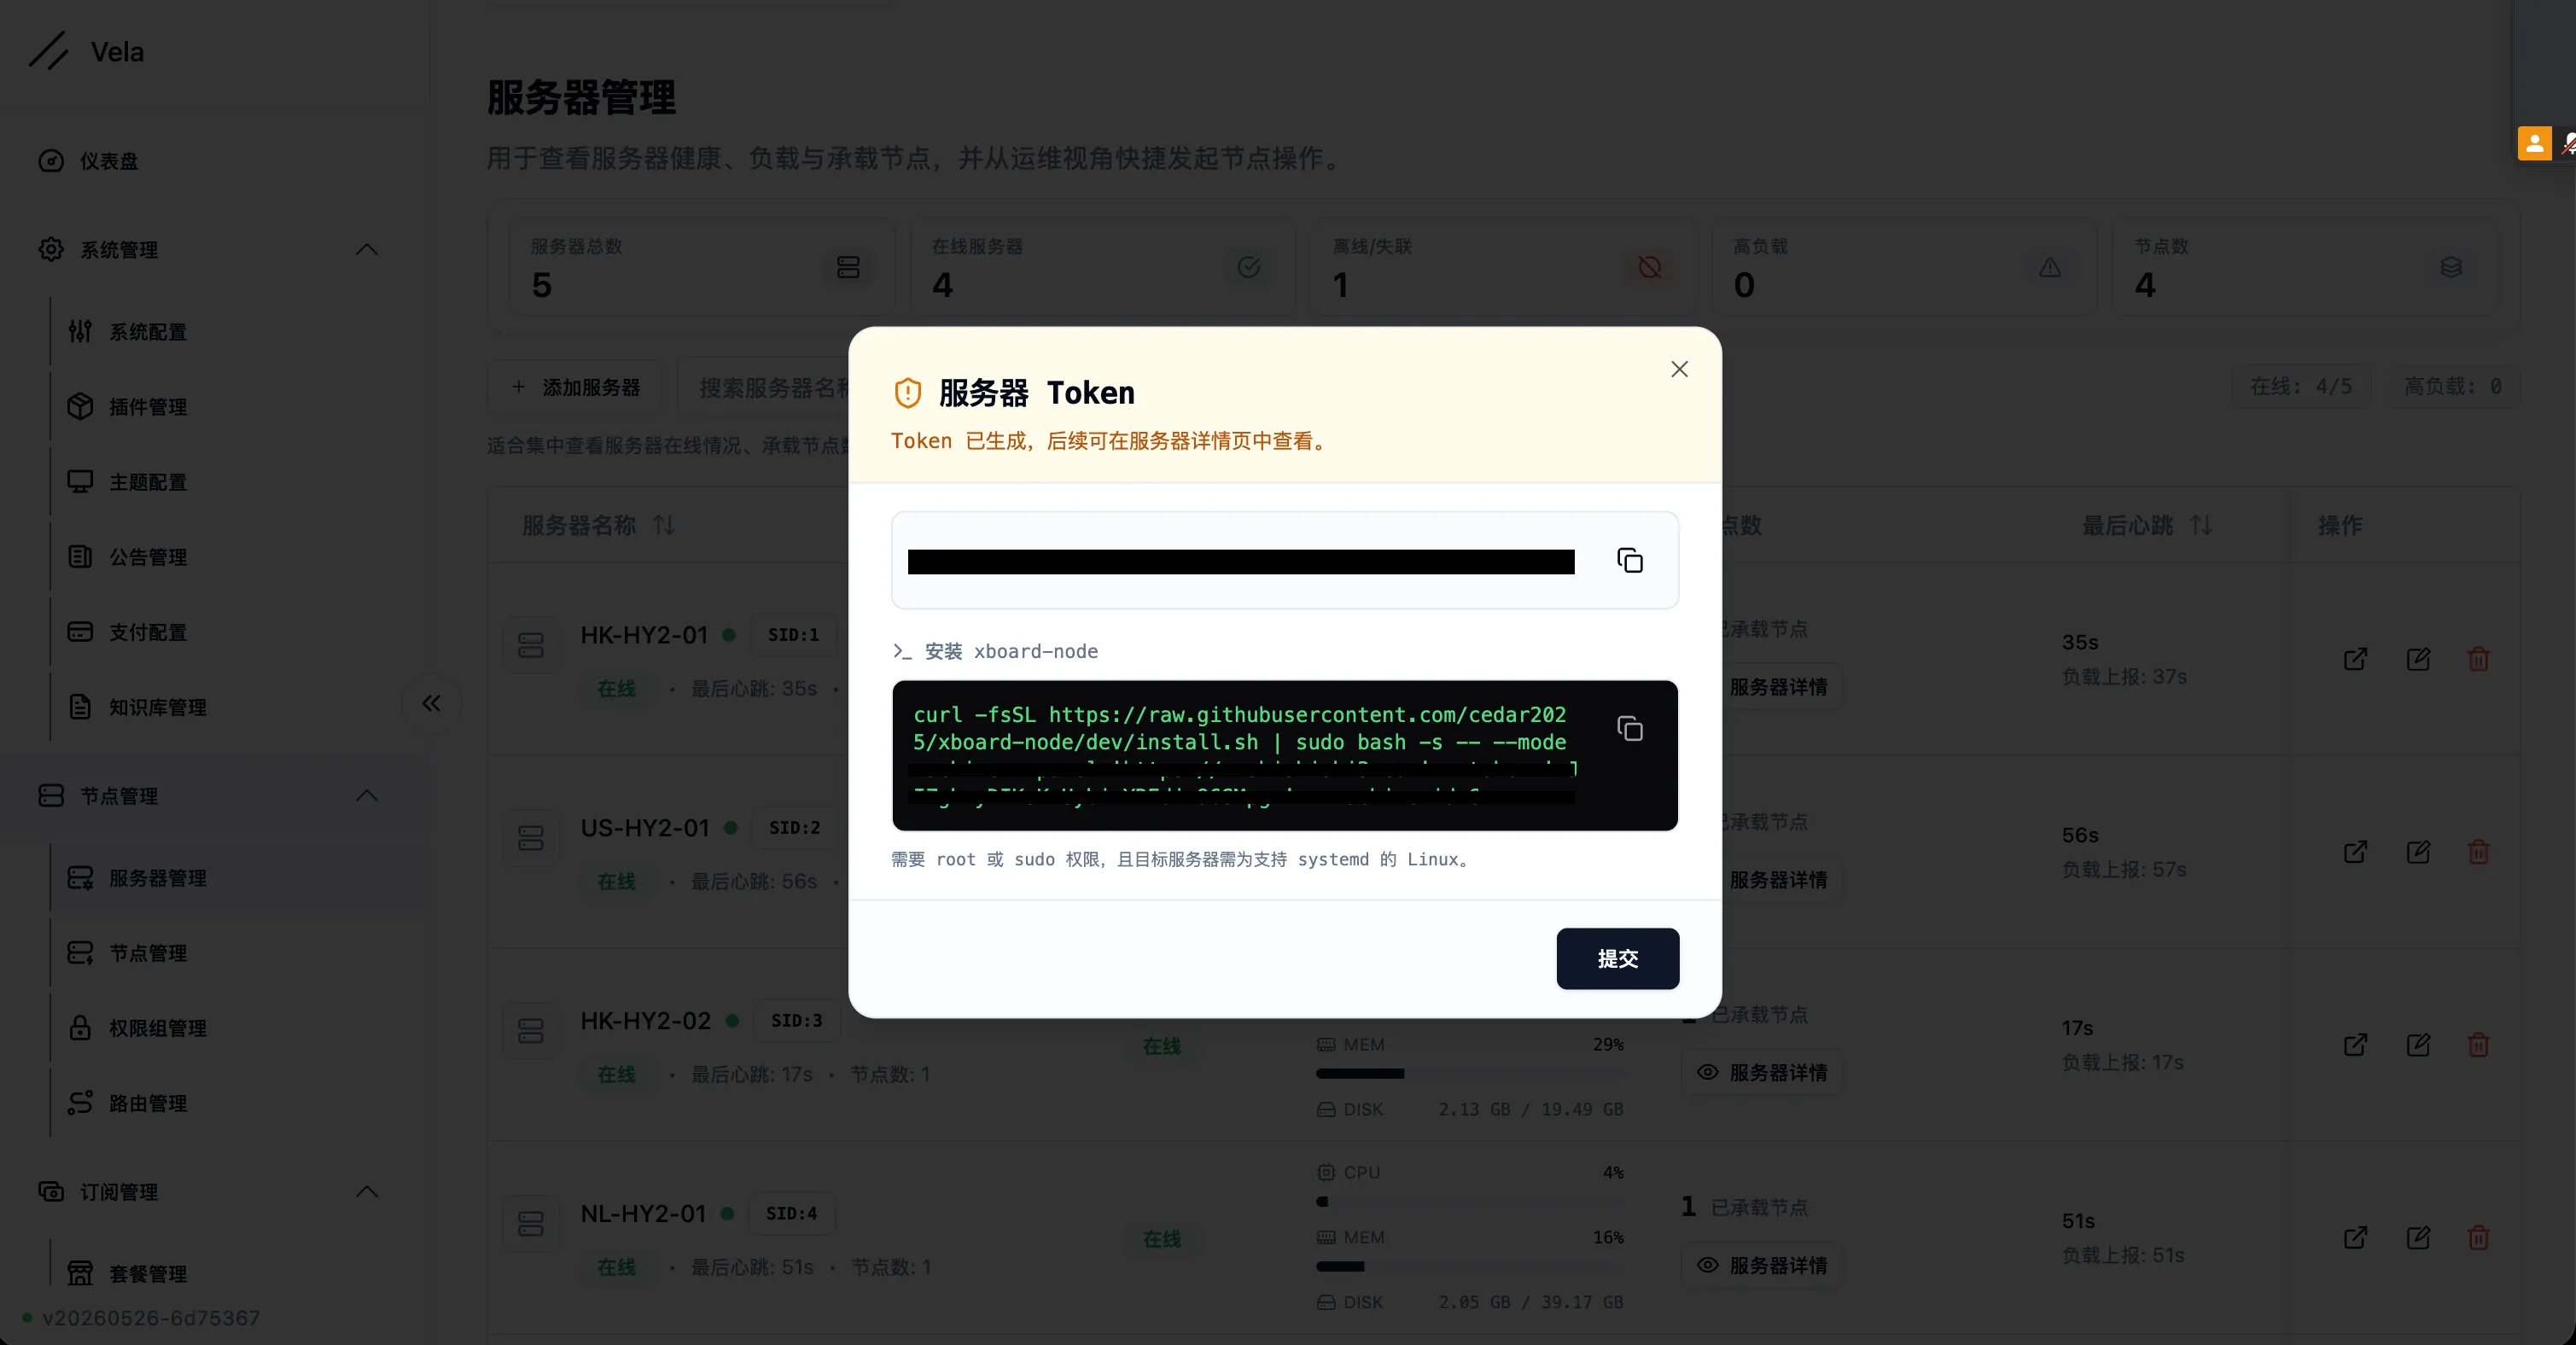
Once installation is done, the backend should show the server online with resource and load information.

11. Configure HY2 Certificates
HY2 requires TLS certificates.
If you are already seeing protocol "hysteria" requires TLS certificate files, jump to Server online but node not running.
If the node server has nothing listening on port 80, you can issue a certificate directly:
sudo apt-get install -y certbot

sudo certbot certonly --standalone \
  -d hk.474769754.xyz \
  --agree-tos \
  -m admin@474769754.xyz \
  --non-interactive
If Caddy or nginx is already bound to port 80 on that machine, stop it first, issue the certificate, then start it again:
sudo systemctl stop caddy
sudo certbot certonly --standalone -d hk.474769754.xyz --agree-tos -m admin@474769754.xyz --non-interactive
sudo systemctl start caddy
The resulting certificate files are:
/etc/letsencrypt/live/hk.474769754.xyz/fullchain.pem
/etc/letsencrypt/live/hk.474769754.xyz/privkey.pem
Copy them into the Xboard-Node directory:
sudo mkdir -p /etc/xboard-node/certs

sudo install -m 0644 /etc/letsencrypt/live/hk.474769754.xyz/fullchain.pem \
  /etc/xboard-node/certs/hk.fullchain.pem

sudo install -m 0600 /etc/letsencrypt/live/hk.474769754.xyz/privkey.pem \
  /etc/xboard-node/certs/hk.privkey.pem
Edit the config:
sudo nano /etc/xboard-node/config.ymlAdd this at the top level:
cert:
  cert_mode: file
  domain: hk.474769754.xyz
  cert_file: /etc/xboard-node/certs/hk.fullchain.pem
  key_file: /etc/xboard-node/certs/hk.privkey.pem
cert: must stay at the top level. Do not indent it under panel: or machine:.
Restart the service:
sudo systemctl restart xboard-node
sudo journalctl -u xboard-node --since "2 minutes ago" --no-pager
Check the UDP listener:
sudo ss -lunp | grep 8443You should see 8443/udp.
The US node is the same idea. Just replace the domain and file paths with:
us.474769754.xyz
/etc/xboard-node/certs/us.fullchain.pem
/etc/xboard-node/certs/us.privkey.pem
12. Firewall and Security Groups
Open these ports on the panel server:
80/tcp
443/tcp
22/tcp
Open these on the node server:
8443/udp
22/tcp
If you are using port hopping:
20000-29999/udpExample ufw rules:
sudo ufw allow 22/tcp
sudo ufw allow 80/tcp
sudo ufw allow 443/tcp
sudo ufw allow 8443/udp
sudo ufw enable
sudo ufw status
If your cloud provider has security groups, open the same UDP ports there too. Opening only the system firewall is not enough.
13. HY2 Port Hopping
Hysteria2 supports port hopping. A practical range is:
20000-29999/udpThe Xboard node settings would look like:
Connect port: 20000-29999
Service port: 8443
Hop interval: 30
On the node server, redirect the port range to the real listening port:
sudo iptables -t nat -A PREROUTING -p udp --dport 20000:29999 -j REDIRECT --to-ports 8443Persist the rule:
sudo apt-get install -y iptables-persistent
sudo netfilter-persistent save
Check both iptables and the UDP listener:
sudo iptables -t nat -S PREROUTING | grep 8443
sudo ss -lunp | grep 8443
During rollout, it is safer to keep both open:
8443/udp
20000-29999/udp
Once everything is stable, you can keep only the hopping range.
If you are worried that ss does not show the full port range, jump to UDP port range not visible.
14. User Subscriptions and Clients
The usual flow is:
Create a plan -> create a user -> attach the plan -> copy the subscription link -> import into the clientIf the imported client shows only DIRECT and no nodes, the common reasons are:
- The user does not have a valid plan.
- The plan’s permission group does not include the node’s permission group.
- The node is marked hidden.
- The node service is not running.
- The client does not support Hysteria2.
- The subscription template does not include HY2.
Inspect the subscription payload directly:
curl -L "https://474769754.xyz/s/your-token"If the output does not contain:
hysteria
hy2
hk.474769754.xyz
US-HY2-01
then Xboard is not distributing the node yet, and the first things to check are plans and permission groups.
If the payload does contain nodes but the client still does not show them, switch to a client or template that supports HY2, such as sing-box, Clash Meta, or Mihomo.
15. Pre-Launch Checklist
Before enabling public registration, I recommend confirming all of the following:
SMTP test mail works
Email verification enabled
Registration captcha enabled
Login captcha enabled
Admin path changed to a random one
Subscription domain only exposes /s/*
Plan permission groups are correct
Node multipliers are correct
HK node uses a higher multiplier
Cloud security groups expose only necessary ports
Suggested trial policy:
Free signup plan: disabled
or 1 GB / 1 day
Do not allocate too much Hong Kong traffic to cheap plans
16. Final Hardening
The final port exposure I recommend is:
Panel server:
80/tcp
443/tcp
22/tcp
Node server:
22/tcp
20000-29999/udp
If you are not using port hopping:
22/tcp
8443/udp
Caddy should expose only:
Full reverse proxy for the panel domain
Only /s/* and required API paths on the subscription domain
Backend settings:
Open registration: only when needed
Email verification: enabled
Captcha: enabled
Admin path: random
Trial quota: extremely low or disabled
Node strategy:
US as the primary route, 1x
HK as the backup route, 5x / 8x / 10x
At that point you are no longer in a test setup. You have something you can reasonably expose and operate.
Pitfalls
Broken apt source
If you run into:
E: The repository 'https://packagecloud.io/ookla/speedtest-cli/ubuntu noble Release' does not have a Release file.that means the Ookla speedtest apt source does not support the current system release. Disable it first:
grep -R "packagecloud.io/ookla" /etc/apt/sources.list /etc/apt/sources.list.d/Suppose the output is:
/etc/apt/sources.list.d/ookla_speedtest-cli.listDisable it like this:
sudo mv /etc/apt/sources.list.d/ookla_speedtest-cli.list \
  /etc/apt/sources.list.d/ookla_speedtest-cli.list.disabled

sudo apt-get update
This was a real issue in my own deployment. Any installer that calls apt-get update can get stuck behind that broken source.
Fake-IP interference
If your machine is running a proxy or TUN, 198.18.x.x fake IP results are normal. Use a public DNS resolver directly, or temporarily disable the proxy while checking records.
Caddy TLS EOF
Typical symptom:
curl: (35) TLS connect error: unexpected eof while readingCheck with:
nslookup domain 1.1.1.1
sudo caddy validate --config /etc/caddy/Caddyfile
sudo journalctl -u caddy -f
The common causes are:
- DNS is not pointing at the server.
- The Caddyfile never made it onto the server.
- Caddy was not reloaded.
- Ports
80and443are not actually open.
Subscription 404
If the response headers look like:
HTTP/2 404
server: Caddy
content-length: 9
then Caddy is blocking the request. Make sure the Caddyfile includes:
handle /s/* {
	reverse_proxy 127.0.0.1:7001
}
SMTP unauthorized IP
Check the logs:
sudo grep -R "SendEmailJob\|SMTP\|Unauthorized" /opt/Xboard/storage/logs/If you find:
525 5.7.1 Unauthorized IP addressthen Brevo is rejecting the outbound IP address. Check the IP used by the Xboard container:
cd /opt/Xboard
sudo docker compose exec -T xboard curl -s https://ifconfig.me
Add that IP to Brevo’s Authorized IP addresses.
Server online but node not running
Inspect the node logs:
sudo journalctl -u xboard-node -n 120 --no-pagerIf you see:
requires TLS certificate filesthen HY2 is missing certificate configuration. Go back to Section 11 and add the cert: block correctly.
Node running but idle
This is normal. It simply means the node process is up, but no client is actively using it at the moment.
UDP port range not visible
Check:
sudo ss -lunp | grep 8443If you are using port hopping, it is normal that ss shows only 8443, because the process is actually listening on that single backend port. Use iptables to inspect the forwarding rule:
sudo iptables -t nat -S PREROUTING | grep 20000Also remember to open 20000-29999/udp in your cloud security group.
Cannot delete a plan
If the backend says that the plan cannot be deleted because orders still reference it, do not force-delete it.
A safer pattern is:
Disable the plan
Hide the plan
Close purchases
Rename it to Test-Deprecated
Keeping historical order references intact is normal in production systems.
References
- Xboard compose branch and
ghcr.io/cedar2025/xboard:latest:https://github.com/cedar2025/Xboard/tree/compose - Official compose file with host
7001mapped to container7001:https://raw.githubusercontent.com/cedar2025/Xboard/compose/compose.yaml - Xboard-Node with Hysteria2, machine mode, node mode, and install script:
https://github.com/cedar2025/Xboard-Node - Hysteria2 Port Hopping:
https://v2.hysteria.network/docs/advanced/Port-Hopping/ - Cloudflare Email Routing:
https://developers.cloudflare.com/email-service/get-started/ - Brevo SMTP:
https://help.brevo.com/hc/en-us/articles/7924908994450-Send-transactional-emails-using-Brevo-SMTP